Plot Progression

Plot Progression gives you a linear view of your storys 4 throughlines, showing how the plot in each progresses over time.
The 4 Signposts are indicators of where the characters stand at certain key points along their journey through the story.
The 3 Journeys are dramatic Acts, detailing the events the characters must experience and deal with on their travels from one signpost to the next.
To view the Signposts & Journeys, use one of these methods:
Under the Storytelling Menu, select Plot Progression
At the Dramatica Desktop, click on the Plot Progression tile.

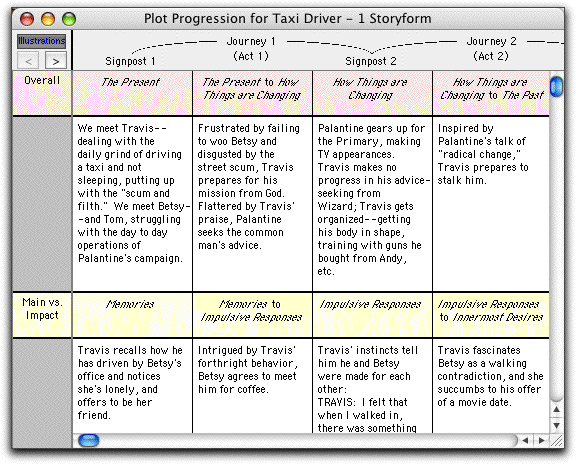
The Plot Progression Window
For each throughlineOverall, Main vs. Impact, Main Character, and Impact Character the Signposts and Journeys are laid out in a linear fashion, from left to right, as they progress through the story from beginning to end. Each Storyform throughline displays in a different color.
Signpost Storyforming
Each field in a Signpost colored fieldsuch as Overall Story Signpost 1contains a dramatic element assigned by you and Dramatica when you reached a single Storyform.
If you havent yet reached one Storyform, you can assign dramatic elements here in the Plot Progression window:
Click on the name of the dramatic element (or an unchosen item) in the colored Signpost field. A pop-up menu of available elements displays.
Click on an element to select it.
The 4 Signposts of a particular throughline will always be one of the following groups:
The Past, How Things Are Changing, The Future, The Present
Understanding, Doing, Obtaining, Gathering Information
Visualizing a Plan, Playing A Role, Changing One's Nature, Conceiving An Idea
Memories, Impulsive Responses, Innermost Desires, Contemplation
The other 3 throughlines will take the remaining 3 groups of Signposts. The order in which these elements occur as Signposts is determined by the unique structure of your story.
Journey Storyforming
Each colored field in a Journey columnsuch as under Overall Story/Journey 1displays the two signposts that the Journey is traveling between.
Colored Journey fields are not editable. Their contents are determined by the Signposts before and after them.
Resizing Plot Progression columns
At top left of the Plot Progression window are two directional buttons:
< Click on the Left-pointing arrow button to Decrease the width of all the columns, displaying more of the Signposts & Journeys onscreen.
> Click on the Right-pointing arrow button to Increase the width of all the columns, displaying less of the Signposts & Journeys onscreen.
Navigating the Plot Progression window
Move around in the Plot Progression window using the Vertical and Horizontal Scrollbars, at right and bottom of the window respectively.
Use the Tab key to move between the Signposts and Journeys in a linear fashion, from left to right and top to bottom.
Use the Up, Down, Left, and Right Arrow keys on the keyboard to move from field to field.
Illustrations
To toggle the display of your storys Illustrations on and off:
Click on the Illustrations button at top left of the Plot Progression window.
Beneath each colored Throughline, another row displays. The writing you did in the Illustrating stage displays in the field below each Signpost and Journey. The fields in this row are blank if you havent done any Illustrating yet.
To edit the Illustrations:
Double-click on the field containing the text you want to edit. The Edit Illustration window displays.
Add, change, or delete text as desired. Use the Cut, Copy, and Paste commands if needed.
Exit the Edit window by clicking on the OK button (to save your changes) or the Cancel button (to discard the changes).