Story Points
The Story Points window presents your Storyforming and Illustrating information in a table format.
Its advantage over the Query System is that it gives an overview of your entire story, offering quick and easy access to any area. However, it lacks the Query System’s question and answer format and extensive help.
Access the Story Points window using one of these methods:
Click on the Story Points tile on the Dramatica Desktop.
Under the Storytelling Menu, select Story Points.
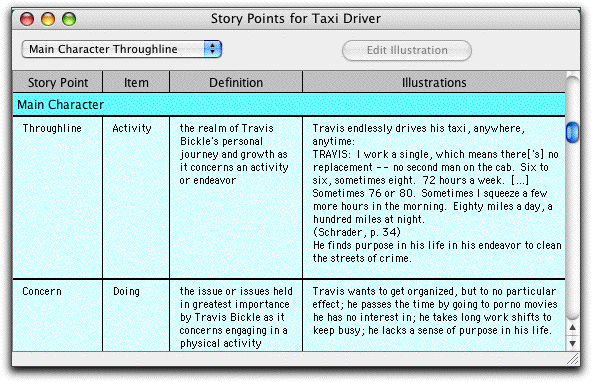
Story Points Window
The Story Points table is divided into four columns:
The Story Point column displays each important Dramatica topic or Story Point by name.
The Item column displays the item chosen to answer the Storyforming question posed by the Story Point. (If your story is not down to a single storyform, nothing will be displayed in the Item column.)
The Definition column links the Item and Story Point together by using the definitions of each term in a sentence.
The Illustrations column displays any examples you’ve written for the story point.
Navigating Story Points
Story Points is arranged in a table format, divided into sections by the categories of Genre, Theme, Plot, and Overview. Each section displays in a different color.
The Story Points table is divided into the these sections:
Genre Points
Story Dynamics
Thematic Points
Overall Story
Main Character
Impact Character
Main vs. Impact Story
Plot Points
Central Plot Points
Overall Story Type Order
Main Character Type Order
Impact Character Type Order
Main vs. Impact Story Type Order
Overview Points
General
Audience Appreciations
Above the table area is a pop-up menu for moving directly to a specific section.
Story Points Pop-Up Menu
Choose a Story Points section to work in from the pop-up menu at top left of the window. The Story Points window jumps to that part of the table.
Scroll Bar
Move vertically through a particular Story Points section using the scroll bar on the right side of the Story Points window. To move quickly between the section currently displayed, slide the scroll bar button up or down.
Edit Illustration
To edit the Illustration text:
Double-click on a text box in the Illustrations column.
-or-
Click on a text box to highlight it, then click on the Edit Illustration button.
The Edit Illustration window for that particular story point displays. Change or add to the text, as desired.
Exit the Edit window by clicking on the OK button (to save your changes) or the Cancel button (to discard the changes).
Set Font
To change the font and/or size for all the text displayed in the Story Points table:
Under the Edit Menu, select Set Font… The Set Font window displays.
Select a font and/or size from your system’s available fonts.
Click on the OK button to apply the new font selection.
Any changes you make are applied to the text in all four columns.
To change the font and size for a specific column in the Story Points window:
Click on the column’s title (Story Point, Item, Definition, or Ilustration) to select and highlight it.
Under the Edit Menu, select Set Font… The Set Font window displays.
Select a font and/or size from your system’s available fonts.
Click on the OK button to apply the new font selection.
The font and size for the other columns will remain unchanged.
Changing Column Widths
To change the column width for a specific column in the Story Points window:
Move the mouse over the column separator line in the area above the Story Points table (for example, over the line between Item and Definition). The cursor changes to a split-diamond shaped column cursor.
Hold down the mouse button and drag the column separator left or right, until the columns have the desired width.
Release the mouse button.