Theme Browser

Contents
|
The Theme Browser is recommended for Advanced Users Only. |
The Theme Browser displays a 3-Dimensional view of your story's dramatic elements, giving a bird's-eye look at how they interconnect.
The Theme Browser Window
The Theme Browser allows you to approach Storyforming from an opposite perspective to that taken in the Story Engine. There, you answer topics by choosing from story points. In Theme Browser, you take a story point and from a list of available topics, decide which one to attach it to.
Let's say you decided to create a story where the Main Character's Problem is in the area of Inequity.
•Using the Query System, you would go to the Main Character questions and find the one that asked you to choose MC Problem. Scrolling down the list of elements, you would select Inequity to assign it as MC Problem.
•Using the Theme Browser, you would go directly to the Inequity element (you'd have to know where it was located, or browse to find it). With the option Allow Storyform Changes checked (see Browser Function pop-up menu, below), you would scroll through the pop-up menu choices and select Main Character Problem to assign Inequity to it.
Taking this approach to Storyforming requires a level of familiarity with Dramatica that is beyond the grasp of the beginning user. For that reason, the Theme Browser is recommended for Advanced Users Only.
(Note: You cannot reach a single storyform using the Theme Browser only. You must make other choices in either the Story Engine or Query System.)
Access the Theme Browser using one of these methods:
|
•Click on the Theme Browser icon. •Under the Project menu, select Theme Browser… |
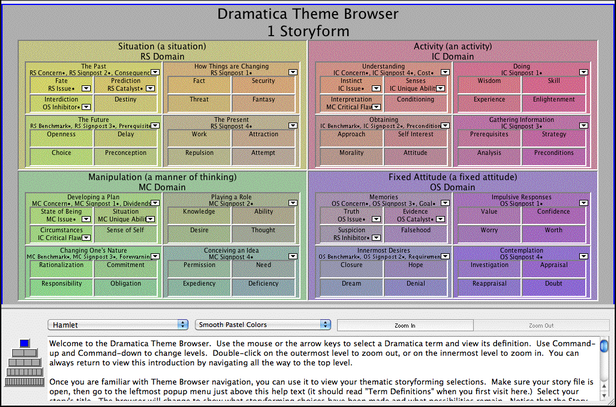
The Theme Browser shows all of the dramatic elements possible for a storyform in Dramatica, arranged in a grid format. A storyform is made up of these elements, though no single storyform contains all of them. Rasther, your selection from among them determines your story's thematic emphasis and its impact upon an audience.
Navigating the Theme Browser
The grid of dramatic elements is arranged in layers. Move around using the following commands:
•Click on a dramatic element to make it the current selection.
•Press Command+Up Arrow to move Up one layer closer to the Top layer (or click on the Zoom Out button).
•Press Command+Down Arrow to move Down one layer closer to the Bottom layer (or click on the Zoom In button).
•Move up, down, left, and right on the Theme Browser screen using the Up, Down, Left, and Right movement keys on the keyboard.
Browser Function pop-up menu
This menu lets you choose the Theme Browser's display modes and settings. Options are:
•Term Definitions--If selected, puts the Theme Browser in View Only mode. No story file is selected. Click on a dramatic element to see its definition in the Term Definitions box at the bottom of the Theme Browser window.
•"Your Story"--If selected, the name of the story file you choose is checked off (which is "Your Story" in the case of a new unsaved file). Any storyform topics you have answered in other parts of Dramatica display below the name of the dramatic element they are attached to.
•Allow Storyform Changes--If selected, displays pop-up menus next to those dramatic elements that can be changed from the Theme Browser.
Click on the Down-pointing arrow next to an element to display its Story Points pop-up menu, then click on your choice to select it.
If the element can be used for other topics, they remain on the menu and are available for selection. When the element cannot be used anywhere else in the storyform, the pop-up menu will not be visible.
•Show Signposts--If selected, also displays the Act types or Signposts that certain elements can be attached to--in the same pop-up menu as Allow Storyform Changes. The 4 Signposts of a particular throughline will always be one of the following groups:
oThe Past, How Things Are Changing, The Future, The Present
oUnderstanding, Doing, Obtaining, Gathering Information
oDeveloping a Plan, Playing A Role, Changing One's Nature, Conceiving An Idea
oMemories, Impulsive Responses, Innermost Desires, Contemplation
The other 3 throughlines will take the remaining 3 groups of Signposts. The order in which these elements occur as Signposts is determined by the unique structure of your storyform.
Color pop-up menu
The colors and shades of gray assigned to the various parts of the Theme Browser are designed to be visually pleasing, but have no functional meaning in Dramatica. Experiment to find the most pleasing color scheme.
If you find the different shades and colors distracting, select Solid Gray instead. Color choices are:

Zoom In
Click on this button to "step forward," moving your view of the Theme Browser one layer closer to the Bottom layer.
Zoom Out
Click on this button to "step back," moving your view of the Theme Browser one layer closer to the Top layer.
Navigation Tree

This "pyramid" graphic represents the different layers in the Dramatica model of story. The currently selected layer is highlighted in blue.
•The Top layer is an overview level, showing all 4 Classes or Throughlines.
•The second layer represents a Throughline (e.g., Activity).
•The third layer moves down into one of these Throughlines to the Type level (e.g., Obtaining).
•The fourth layer goes into that Type to the Variation level (e.g., Morality).
•The Bottom layer under a Variation is the Element level (e.g., Faith).
Storyforms Remaining
As you make a single choice in one of your storyforms--your story's Throughline, for example--notice that the number of potential Storyforms Remaining (displayed at top right of the window) decreases.
Navigation Grid
![]()
As you move down into the layers of the Theme Browser, there are more items than can display onscreen at one time. To move sideways to an area on the same layer, use the Navigation Grid.
The currently selected area is highlighted in blue.
•To move instantly to another area, click on its square on the Navigation Grid.
•Move up, down, left, and right on the Navigation Grid using the Up, Down, Left, and Right movement keys on the keyboard.