Before issuing the shooting script for the first time, turn on and/or customize all the Production Features you'd like to use (especially Top and Bottom Continueds!). Each of these options is described in detail elsewhere in the manual and in this Online Help.
1. |
Save the screenwriter's final draft , using File > Save As... Give it a different name to reflect the date and its status as the White shooting draft you're about to create (e.g. MyScript WHITE). Now you can save your work at regular intervals, using the Save command. |
NOTE: To customize the Production Features for the way you or your production company work, continue with Steps 2 and 3. To accept Screenwriter's default settings, skip directly to Step 4.
2. |
Under the Format menu, select Element Styles.... |
• |
Click on the Scene Headings button and set the Scene Numbers and Scene Continued Text to your preference. |
• |
Click on the Locked Scripts button and set the Scene Omitted Text, A-Scene Numbering Scheme, Revision Mark Text and Locked Letter Skip List to your preferences (Do not Lock Scene Headings and Page Breaks here. You'll do all Locking from the Production menu.) |
• |
Once you have the settings customized to the way your production company works, click on Make Default for All New Documents if you want all new files to have this format. |
• |
Click on the OK button to accept your changes. |
3. |
Under the Tools menu, select Options…. |
• |
Click on the Revisions tab and set the Revision Marks options to your preference. |
• |
Click on the Printing tab and set the Print Bottom Continueds and Print (MORE) options to your preference. Click on the OK button to accept your changes. |
4. |
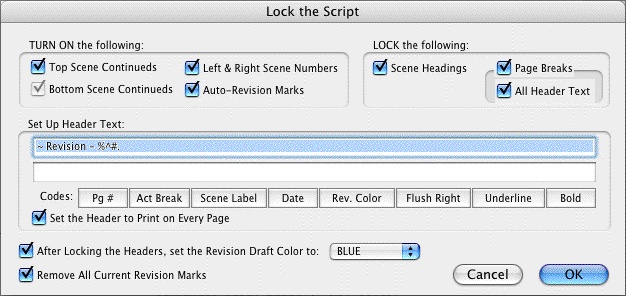
Under the Production Menu, select Lock the Script. Click OK to confirm your decision. A Lock the Script window displays. |
 Screenwriter's defaults for Locked Scripts are already selected for you. Generally, you will want to accept these settings unless your Production Company dictates otherwise. If desired, you can:
• |
TURN ON or off the options you prefer by clicking on their check boxes. Grayed-out options have already been selected by your prior choices in Element Styles.... |
• |
LOCK or Unlock items, as you prefer, by clicking their check boxes. |
• |
SETUP the Header Text by editing the default codes. Click on a Code's button to enter it in the Header. The default Header Text for the White shooting script reads something like: |

...using the current date and page number.
• |
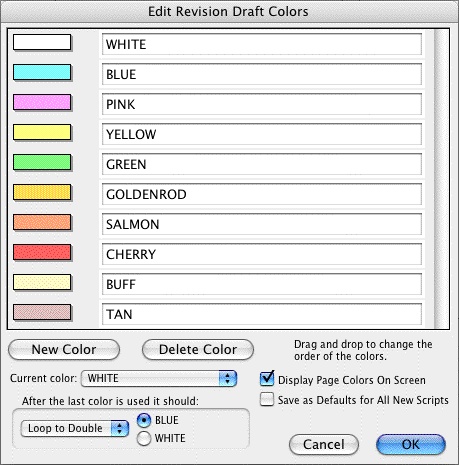
Change the Revision Draft Color order, if desired. Screenwriter uses the following industry standard Revision Draft Color order: |

White
Blue
Pink
Yellow
Green
Goldenrod
Salmon
Cherry
Buff
Tan
After you have locked this—the White shooting script—for the first time, Blue will be set as the next revision color.
Click on OK to accept your changes or the defaults and Lock the Script.
A prompt displays, telling you that you're ready to print the White draft and then start making Revisions that will appear in the Blue draft. Click on OK to continue.
5. |
Next, update the Title Page. Under the View menu, select Title Page Publisher. Create a text box and start the Running List, with the current Date and Revision Draft Color. Click on OK to save the changes. |
6. |
Save the script under File > Save. |
7. |
Print the White draft Shooting Script. Under the File menu, select Print. Copy and distribute the script to all concerned parties. |
