Printing in Screenwriter is accessed through the Print Window.
Under the File menu, select Print.
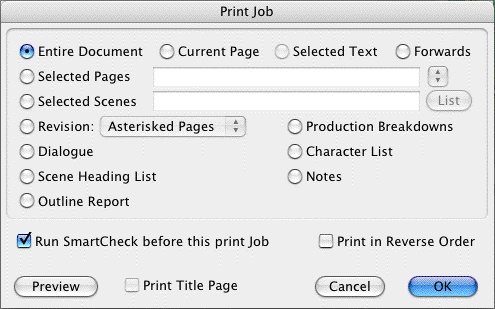
You will see the following window. Check one of the print selection radio buttons on the top half of the screen. Screenwriter's default is to select Current Page.

• |
Current Page—If selected, prints the page that the cursor is currently on. |
• |
Forwards—If selected, prints from the current page through to the end of the document. |
• |
Entire Document—If selected, prints the entire document. If you have created a title page in the Title Page Publisher, it is also printed. |
• |
Selected Text—If checked, prints the text block you have selected in your document. If no text is selected, this option is grayed out and unselectable. |
• |
Selected Pages—If selected, prints the Pages you select. Enter the page numbers in the same order they appear in the document (i.e. lower numbers first). |
Enter individual page numbers separated by commas (1,3,32)
Enter a section of consecutive pages using a dash between the first and last page (45-78) or (89-end)
Or combine the two methods (1,3,32,45-78,89-end)
• |
Selected Scenes—If selected, prints the Scenes you select. Enter the scene numbers in the same order they appear in the document (i.e. lower numbers first). |
Enter individual scene numbers separated by commas (1,3,32)
Enter a section of consecutive scenes using a dash between the first and last scene (45-78) or (89-end)
Or combine the two methods (1,3,32,45-78,89-end)
List—Click on this button to see a List Menu of all the scenes in your document with their Scene Headings.
Select a scene by clicking on it.
De-select a scene by clicking on it again.
OK—Click OK when done to confirm your selections.
• |
Dialogue—If selected, displays a Dialogue Selection menu. Check a radio button to select the kind of Dialogue to print, and select one or more Character Names. |
Dialogue With Reference Page Numbers and Statistics—If checked, prints a dialogue report with page number references and statistics about the number of speeches, words, sentences, and sentence length for each character.
NOTE: If you select all characters, a screen displays asking if you'd like to print characters' dialog in Script order rather than printing all of one character's dialogue at a time. If you click on Yes, your Dialogue report will not contain any statistics. If you click on No, statistics will appear in your printed report.
Dialogue With Cues for Actors—If checked, prints all the dialogue for selected characters along with—either a Dialogue Cue preceding the speech (if available), or the preceding line of Action.
Entire Scenes that ANY of the Selected Character(s) is/are in...—If checked, scans the document and finds only those scenes where At Least One of your selected characters is present. Those scenes are automatically placed in the Selected Scenes window, ready to be printed.
Entire Scenes that ALL of the Selected Character(s) is/are in...—If checked, scans the document and finds only those scenes where All of your selected characters are present. Those scenes are automatically placed in the Selected Scenes window, ready to be printed.
Dialogue Numbered/Laid Out for Animation Recording Scripts—If checked, prints dialogue only with each speech numbered sequentially.
Animation Recording Script Format - Asterisked Speeches Only—If checked, prints dialogue only with each speech numbered sequentially—but only Revised dialogue speeches, which have Asterisks in their right margin.
Select Names—Click on one or more Character Names in this window to print their dialogue. Click on a name again to de-select it.
Select All—Click on this button to select all Character Names in your document.
Clear Selected—Click on this button to de-select all Character Names you have selected.
Click on OK to save your Dialogue selection and return to the Print menu, or Cancel to discard your selection.
• |
Character List—If selected, prints an alphabetical list of all Character Names in the document. |
• |
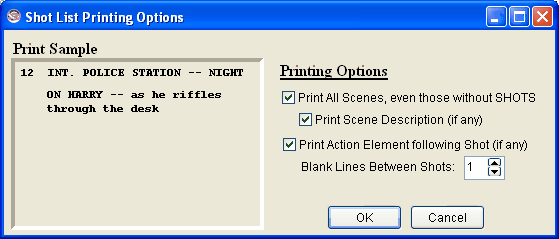
Shot List—If selected, pints a list of scenes and shots with or without scene description or action elements. |

• |
Unique Locations List—If selected, prints an alphabetical list of all Scene Locations in the document. |
• |
Scene List—If selected, prints a list of numbered scene headings in script order. |
• |
Production Breakdowns—If selected, displays the Production Breakdown Print menu when you click on the OK button. See the Production Breakdown Print menu section, below. |
• |
Notes—If selected, prints all Notes with the page numbers they appear on. When you click on the OK button, a Notes Print menu displays: |
Print Notes Sequentially with Reference Page Numbers—Prints a separate Notes report of all notes listed in sequence with the page numbers they refer to.
Print Notes on facing pages of document (already printed document)—Prints each Note opposite the page it refers to, on the back of the previous page.
Have it Prompt you to Insert Each Page as needed—Only asks you to insert the page preceding a Note, so it can print the note for the following page. Requires you to insert pages one at a time.
Print without Prompting (requires you to insert entire document)—Requires you to insert the entire document, including a Title Page. Screenwriter only prints on those pages that have a Note on the following page.
Select Which Color Notes to Print—If you have more than one color of Note in your document, check the colored boxes for the notes you want to print.
•Revision—If checked, prints pages based on your selection.

Asterisked Pages—If checked, prints only those pages which have Current Revision Marks on them, and any A-Pages immediately following them.
NOTE: If you're working in a Locked script with Draft Revision Colors, this displays a list of Revision Colors, as in the pictured example.
•Print in Reverse Order—Prints your selection in reverse order, starting with the highest numbered pages/scenes.
•Run SmartCheck before this Print Job—If checked, SmartCheck checks your document for common formatting errors before printing. (If you have set SmartCheck to always run before printing —in Options… under the Tools menu—it is checked here. Turn it off for this print job only by unchecking the box.)
•Print Title Page—If checked, prints the title page at the head of the script. Only available if you have created a Title Page in the Title Page Publisher. Selecting an Entire Document to print automatically checks this box and prints the Title Page.
•Preview—Click this button to see a Print Preview of the current selection, in WYSIWYG format. Click on the appropriate button for:
oPrint—Sends the onscreen page to the printer, formatted exactly as it looks (but at 100% size).
oPrev.—Goes to the previous page in the document.
oNext—Goes to the next page in the document.
oClose—Exits the Print Preview screen, back to the Print Selection menu.
oZoom In—Displays the document page larger onscreen. Cycles through 53%, 93%, 133%, 173%, 213%, 253% of actual page size.
oZoom Out—Displays the document page smaller onscreen. Cycles through 53%, 93%, 133%, 173%, 213%, 253% of actual page size.
